Pages

Monday, December 29, 2014

A New Step-by-Step Tutorial for 2015

Well,  we're  not  quite  there  yet,  but  only  a  couple  of  more  days  till  2015--so  an  early  Happy  New  Year  everyone!   And  I  thought  of  starting  the  new  year  off  with  a  small  tutorial.    First--the  finished  piece--


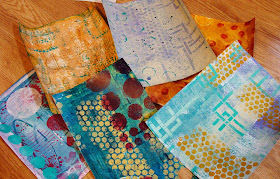
But  let  me  back  up,  and  show  you  how  I  started.   I  began  by  getting out  my  paints  and  art  tools  and  warming  up  by  painting  papers  on  heavy  card stock  paper  (110lb  paper  that  I  get  at  Staples  office  supply  store)--


there's  actually  a  lot  more  where  these  came  from,  but  these  are  the  ones  that  I  chose  for  my  'palette'.    As  far  as  the  techniques  I  used  for  these  papers--there  are  endless  step-by-step  tutorials  on  you tube--if  you  put  in  a  search  for  art  journal  backgrounds--you'll  find  them.   I  also  have  tutorials  on  painting  papers  on  my  blog  here-under  the  tab  "Tutorials".   A  lot  of  my  favorite  little  tricks  are  ones  that  I  discover  by  just  fooling  around  or  by  accident--the  happy  accident.   And  I  also  want  to  add  my  Gelli  Plate--my  new  friend!   This  is  what  I  do  to  get  me  warmed  up,  and  what  I  really  enjoy  doing,  but  there's  no  reason  why  you  can't  use  scrapbook  papers--or  any  decorative  papers  that  you  may  have.

I  worked  on  a  6 x 12  wood  cradleboard  with  deep  sides,  which  I  decopauged  with  book  pages--


I  like  working  on  the  wood  surfaces,  because  they're  easy  to  stamp  on  and  adhere  papers  to   as  opposed  to  the  wrapped  canvases,  and  I  wasn't  sure  at  the  time  what  I  was  planning  on  doing--but  again,  this  is  whatever  your  preference  is.

Next,  for  my  background--

I  got  out  my  inktense  blocks--these  are  great--a  very  intense  watercolor  stick,  but  I  used  gesso  (any  gesso,  it  doesn't  matter)  instead  of  water--I  like  the  effect  that  you  get  when  you  use  the  gesso.    Also  a  little  acrylic  ink  here  and  there--this  was  the  first  layer.

Next  layer--


I  added  a  bit  more  acrylic  paint  here  and  there  and  some  tim  holtz  tissue  paper  on  the  bottom  with  added  color.   There's  no  right  or  wrong--I  could  have  kept  going  with  the  layers.

So  someone  on  my  Facebook  page  requested  a  cat  piece--and  that's  where  the  cat  idea  came  from.  First  thing  I  did  was  make  my  'template'--


And  then  I  cut  up  the  blocked-out  segments  of  the  cat   and  numbered  them--making  it  much  easier  to  cut  out  the  same  pieces  with  my  paper--

...kind  of  like  a  puzzle   :-)

So  next--assembling  this  'puzzle'  on  my  cradle  board--


my  kitty  with  some  daisies  I  just  use  regular  gel  medium  to  adhere  all  of  these  pieces.

next  step--the  fun  part--


bringing  everything  to  life.....I  wanted  to  define  the  different  papers,  so  I  used  my  new  Fude  Ball  pen.  I  recently  discovered  this  pen--nice  dark  black,  writes  over  basically  anything,  and  permanent  when  dry.  I  also  used  some  acrylic  paint  to  shade  the  sides  of  the  papers.   This  is  also  the  time  when  the  organic  process  starts--no  plan  in  mind--I  just  listen  to  my  muse.   I  added  the  scrolls  with  the  pen,  the  butterfly  and  the  Imagine  stamp.

The  finishing  touches--


some  brads  for  the  flower  centers,  and.....


don't  forget  the  sides---I  used  a  small  flower  stamp.  And  then  I  coated  it  with  coats  of  gloss  varnish--the gloss  gives  it  that  mosaic/stained  glass  look  that  I  really  like.

If you have any questions about this project or to see lots more of my current art, please visit and like my Facebook Art page HERE 
That's the best way to reach me
I have new artwork on there where I post most every day, and if you see anything that you would be interested in let me know!

Thursday, December 11, 2014

My Etsy Shop is Open!

Just  a  quick  post  to  let  you  know  that  these  items  are  in  my  Etsy  shop.   Some  have  sold  already,  but  if  you  see  something  you're  interested  in--and  it's  not  available--just  let  me  know!


go  HERE  for  my  shop--I'll  be  listing  a  few  more  in  the  next  couple  of  days!


Wednesday, November 19, 2014

New Painted Papers=New Art

I  have  to  say  that  this  has  to  be  one  of  my  favorite  ways  to  create  art--'painting'  with  my  papers that  I  painted.   The  first  thing  I  did  this  time  was  get  out  my  Gelli  Plate--


I'm  still  a  beginner  when  it  comes  to  the  gelli  plate,  but  you  still  get  great  results.  The  scraps  that  you  see  laying  there  are  what  I  used  as  masks  on  the  plate,  and  they're  ready  to  use  as  collage  also.

Next,  I  went  for  texture--


I  got  out  my  heavy  gel  medium,  stencil,  and  texture  comb (hair  pick)  for  the  front  2  papers,  and  the  back  one  is  textured  wallpaper.

And  then  more  painting  with  all  of  my  paint  that  I  had  out--


added  with  my  printed  papers--there  ended  up  being  a  good  amount  to  play  with.   I  just  want  to  mention  that  all  of  these  papers (including  the  textured ones  in  the  photo  above)  are  a  110lb  cardstock  paper--stands  up  to  anything!  I  paint  on  these  like  I  would  on  a  canvas  or  any  surface,  for  that  matter.   I  get  it  at  Staples  (office  supply  store),  in  a  big  pack  that  lasts  a  Long  time.

I  started  with  a  6  x  18  wood  deep--edge  cradle  board--


I  really  like  this  size.....so.....I  made  another  one..


....this  time  I  used  my  textured  paper  for  the  roof..


...and  added  some  fun  embellishments..


a  knob  and  an  old  door  faceplate  that  I  painted  to  match  with  the  colors  of  the  house.

And  1  more  6 x 18--


haven't  made  an  angel  in  a  while--this  was  fun--I  added  some  ephemera  to  the  dress--really  liked  how  she  turned  out!

More  paper  fun--


using  up  those  scraps  this  time  on   8 x 8  cradle  boards..


And  1  more--probably  my  favorite--my  'upcycled'  piece--


a  cupboard  door


I'll  always  find  a  use  for  all  of  the  'stuff'  that  I've  collected  over  the  years  : )

Tuesday, October 28, 2014

New Cupcake Art--Start to Finish

So,  in  my  last  post,  I  showed  you  my  latest  painted  papers,  and  yes  I've  been  using  them--as  a  matter  of  fact,  there's  only  a  few  scraps  left.   And--yes,  I  have  some  new  cupcakes  to  show--


But  before  I  show  you  the  different  stages  of  this  one,  let  me  show  you  some  more  art  with  my  papers--


It's  fun  using  your own  painted  papers  as  your  main  medium  when  making  an  art  piece!

So....back  to  the  cupcake  piece--I made  a  piece  similar  to  this  a  few  years  ago,  and  at  my  last  show  I  talked  to  a  lady  that  remembered  seeing  that  piece  and  still  regretting  not getting  it  when  she  first  saw  it...so...she  asked  me  to  make  her  one  resembling  the  first  one--and  that's  the  back-story  to  how  this  piece  came  about.

My  first  step--


I  started  with  a  10 x 20 wood  cradle board  with  deep  sides  and  covered  it  with  these  very  cool  book  pages.   This  is  a  physician's  reference  book  that  I  found  at  a  library  book  sale.   The  pages  are  like  a  heavy  tissue  paper--very  similar  to  the  Tim  Holtz  tissue  paper.   A  little  heavier,  but  not  much--the  best  part  about  this  kind  of  paper  is  that  it  becomes  a  bit  transparent  when  collaged  on  to  the  surface,  so  if  I  had  anything  underneath,  it  would  have  come  through  a  bit--great  for  a  layered  look.

Next--


here's  what  I  used  to  add  the  color--I  started  out  with  those  3  inktense  blocks  that  you  see  laying  there---I  have  no  idea  what  the  colors  are--I  just  have  these  all  mixed  up  in  a  box.  If  you're  unfamiliar  with  them--they're  the  same  as  the inktense  pencils  (very  vibrant  watercolor)--I  rubbed the  sides  of  these  blocks  on  to  the  surface  and  then  I  took  a  very  wet  paintbrush  to  spread  the  color  around.   You  can  also  wet  the  tips  of  them  and  put  down  your  color  or  spray  the  surface  with  water--you  get  the  idea!  And  then  I  added  the  titan  buff acrylic  paint  to  bring  the  color  down  a  bit  (they  are  very  intense),  and  then  I  painted  with  the  acrylic  inks  that  you  see  there--there's  the  FW brand  there  and  the  Liquitex--the  Liquitex  is  my  favorite.  I  spread  the  inks  around  with  a  paintbrush  and then  immediately  sprayed  it  with  the  91%  alcohol--


...very  cool  effect...

Next  was  adding  some  of  those  papers  of  mine--


And  now  comes  the part  when  I  forget  to take  photos of  my  progress,  because  this  is  when  my  muse  takes  over.   I  knew  that  I  wanted  cupcakes  on  here  so  I  sketched  them  on  with  a  water  soluble  pencil.   There's  lots  out  there  in  the  market  but  my  favorite  is  General's  Sketch  and  Wash  pencil.    You  can  sketch  your  design,  and  keep  'erasing'  with  water  until  your  happy  with  it.  Once you  start  painting,  the  pencil  marks  will  bleed,  but  will get  lost  in  the  paint.

For  the  finishiing  touches--


I  added   a  little  stamping  around,  and I  shaded  the  paper  with  a  black  pitt  pen.   I  added  more  paper--


...for  a  border  on  top  and  some  more  paint  to  the  background  with  some  stamped  butterflies--this  part  is  very  intuitive  for  me,  and  I  just  keep  going  (with  no  thought  of  a  camera  in  mind)

Last  part (after  I sealed  it with  a  gloss  varnish)--


...adding  the  knobs.

So  with  even  more  scraps  left  yet--I  kept  going--


...mostly  painting--but  you'll  see  some  of  my  papers  here  and  there.   

All  of  these  pieces  are  going  with  me  in  a  couple  of  weeks  to  my  next  show  in  Canton,  Ohio.   I  enjoy  this  time  of  year,  but  sometimes  there's  just  a  bit  of  pressure  trying  to  keep  up  with  my  show  schedule  (I  always  seem  to  bite  off  more  then  I  can  chew  : )  But   I  love  getting  out  and  visiting  friends  that  I  haven't  seen  in  a  while,  and  I  always  appreciate  the  support  of  people  who  come  to  these  shows  and  choose  to  purchase  from  us  artists--helping  us  continue  to  do  what  we  love  to do  most.

Also,  thank  you  all  who  come  by  and  visit  my  blog  and  Facebook  page--I   will  always  appreciate  this!

Monday, October 6, 2014

New Poppies

Ever  since  I  started  painting  poppies (a  couple  of  years  ago)--I  knew  right  then  that  they  were  my  favorite  flower  to  paint--


And  I  have to  give  my  Golden  fluid  acrylics  part  of  the  credit  for  helping  these  flowers  come  to  life.  The  main  colors  I  used  were  Alizarin  Crimson  Hue  and  Cadmium  Red  Medium  Hue (that's  the  main  color)  with a  little  bit  of    Titan  Buff,  Burnt  Umber,  Carbon  Black,  and  Yellow  Ochre--and  even  a  teensy  bit  of   Light  Turquois  (phthalo)--thats  a  golden  heavy  body  acrylic--love  that  color!!   I  finger-painted  with it on  the  background  so  I  wanted  to  add  a  touch  to  the  flowers.   So  my  point  being--it  really  helps  to  use  a  good  paint  when  you  want  to  bring  your  painting  to  life--these  look  so  much  better in  real  life!


This is on   12  x 36  gallery  canvas--great  size!


Here's  a  close-up  view  of  this  painting--


....to  show  you  the  background--I  started  out  by  collaging  a  map  on  to  the  canvas--it  adds  great  texture  under  the  paint


And  still  keeping  those  colors--I  decided  to  paint  some  papers--


I'll  show  you  what  I  do  with  these  in  my  next  post--stay  tuned.......

Wednesday, September 10, 2014

Some New Art With my Favorite Palette

I  always  seem  to come  back  to  these  colors--


....and  my  favorite  subject...


I  haven't  painted  these  guys  in  a  little  while


a  close  up  of  a  10 x 20 canvas


And  that's  what  I've  been  up  to  these  last  couple  of  weeks--getting  ready  for  a  couple  big  shows  coming  up  and  lots  of  other  things  going  on  around  here--trying  to  juggle  everything  : )