Pages

Thursday, March 26, 2015

Round Gelli Plate Tutorial Part 2

In  my  last  post,  I  said  that  I  had  a  plan  for  my  gelli  papers,  which  I  usually do  before  I  start  anything.  I  wrote  in  a  couple  of  posts  back  about  intuitive  painting/art--it's  hard  for  me.  This  time,  I  wasn't  quite  sure  of  what  I  was  going  to  do,  but  then  I  started  to  get  an  idea.  If  you  follow  me  on  Facebook,  you'll  know  that  I  made  a  piece of  art  with  my  first  elephant  : )   I  knew  it  wouldn't  be  my  last,  which  is  where  my  idea  came  for  my  papers. 

 Here's  the  finished  12 x 18  piece--


And  now  I'll  back  up,  and  show  you  my  process.   I  decided  on  a  cradle  board  for  my  surface,  which  is  basically  the  same  as  a  wrapped  canvas  except  it's  all  wood.  It's  much  easier  to  work  on when  you're  adhering  papers to  it.   You  need  some  kind  of  primer  for  the  surface  to  start  with,  such  as  gesso,  but  I (90%  of  the  time)  start  with  thin  book  pages--


--got  out  my  gel  medium  and  brayer  (another  good  reason  for  a  brayer)  and  laid  down  the  papers--the  sides  too.  The  sides  on  this  are  almost  2  inches  deep.  I  like  using  the  papers  underneath--most  of  them  get  covered  up, but  not  all--I  like  that  some  of  the  text  comes  peeking  through  in  random  spots. 

My  next  layer--


For  most  of  it  I  brayered  on  gesso  (ANOTHER  food  reason  for  a  brayer!)  and  random  stamping--part  of  a  technique  that  we  learned  from  Tam  in  Lifebook  2015  (which  you  can  join  at  anytime--highly  recommend!).  And  then  just  an  acrylic  wash  on the  bottom,  because  I  wanted  to  keep  that  part  of  the  text  in  the  foreground.

Okay,  for  the  elephant,  I  decided  to  make  my  little  'puzzle',  like  I  did  in  this  post--


I  explain  this  process  more  in  my  other  post

and  then  with  my gel  medium, I  collaged my papers on  to  the  surface --


and  here  was  my  plan  for  the  cut-out  circles--I  saw  them  as  flowers  or  trees--whatever  you  want  to  call  them.  Now  you  could  very  easily  stamp  the  circles  directly  onto  your  surface,  but  honestly  I  was  a  little  afraid  to, because  I  wasn't  sure  of  the  outcome--and  the  other  reason  is  because  I  really  like  the  texture  and  dimension  that  the  papers  bring.   I  made  a  whole  bunch  of  these  circles,  so  I  could  have  a  choice  of  what  I  wanted  to  use.  (sorry  about  the  bad  lighting--this  was  taken  at  night--I  wanted  to  keep  going)

Next  day--next  step--


....starting  to  add  my  paint--petals  to  my  'flowers'--it's  starting  to  take  shape

more  paint  and  detail  to the  flowers--

......and  some  stenciling  in spots

some  doodling  on  my  elephant  and  flower  'stems'--


...and  even  a  little  more  texture--

hard  to  see  in  the  photo,  but  the  heart  was  stenciled  on  with  light  molding  paste--adds  a  little  more  dimension

So  when  my  gelli  plates  came,  I  wasn't  quite  sure  where  I  would  be  going  with  them,  and  when  I  started  making  prints  from  them--they  'told'  me  the  plan.

I  love  when  a  plan  comes  together : D

Tuesday, March 24, 2015

Round Gelli Plate Tutorial Part 1


I'm  really excited  about  my  new 4"  and  6"  gelli  plates--I  just  had  to  show  everyone  how  they  work!

I  consider  myself  a  newbie  when  it  comes  to  the  Gelli  Plate,  but  I'm  getting  better,  and  the  only  way  to  learn  is  to  do---you  can  watch  countless  videos  and  see  LOTS  of  instructions  on  the  internet,  but  it's  not  the  same--the  more  you  play  with  the  gelli  plate,  the  more  you  find  out  all  of  the  different  techniques  that  you  can  do  with  it,  but  again  there  is  a  small  learning  curve.

So  when  I  received  my  round  plates  a  few  days  ago,  I  just  started  playing  and  playing  and  playing  and..........and  I'll  tell  you  what  really  helped  me  was  the  Gelli  Arts  video  tutorial  that's  up  on  their  blog  right  now--beside the  fact that  the  tutorial  is  very  informative,  you'll  also  want  to  go  there  because  they're  having  an  awesome  giveaway  which  ends  later  on  today.

I'll  show  you  a  little  of  what  I  learned  from  it.   As  their  tutorial  shows,  you  can  use  these  plates  as  a  stamp, which  I  REALLY  loved.   For  the  6  inch  plate,  I  found  this  acrylic  box  frame--which  is  actually  a  picture  frame--in  other  words--anything  clear  and  hard (plastic, glass, mounting stamp block, etc)--as  long  as  you  can  see  through  it  and  the  gelli  plate  adheres  to  it  well.


You  can  see  the  frame  here,  which  works  great  for  the  6"  plate  AND  the  4"  one  as  well.  I  didn't  have  anything  smaller,  so  I  just  used  the  larger  frame  for  the  4"  one--makes  no  difference.   And  you  can  also  see  my tools  of  the  trade  (not  pictured--a  brayer---a  necessity  for  the  plates--makes  it  a  lot  easier)  My  favorite  paints  to  use  for  the  gelli  plates--Liquitex  basics  and  craft  paint--inexpensive,  but  they  work  great!  And  stencils,  stencils,  and  more  stencils--but  they're  only  the  tip  of  the iceberg--so many other  texturizing  tools you  can  use  to  get   really  neat  effects. 

So  the  first  thing  you  do  is  apply  the  paint  with  a  brayer  to  the  plate  after  it's  adhered  to  the  mount  (acrylic box  frame) --just  as  you  would  on  a  regular gelli  plate.  I  found  that  when  I  made  the  circles,  I  liked  the  more  distressed  look.   So  what  I  did,   was  after  I  brayered  the  paint  on,  I  bunched  up  a  dry  paper  towel  and  blotted  up  some  of  the  paint  on  the  plate,  and  then  I  used  it  just  like  a  stamp  on  a  large  piece  of  140lb  watercolor  paper.

You  get  more  of  a  mottled  look  (which  adds  a  little  more  depth)  as  opposed  to  the  solid  color--this  is  my  preference--there's  no  rules  to  this--just  do  what  makes  you  smile.

Next  step  is  laying  the  stencil  over  the  print--


then  apply  the  paint  to  the  plate  once  again  with  a  contrasting  color,  and  again,  I  did  the  same  thing  with  the  paper  towel  (blotting  up  some  of  the  paint)--then  stamp  over  the  existing  print--that's  what's  great  about  the  clear  mount  you  can  see  exactly  where  to place  the  gelli  plate.  As  far  as  keeping  the  plate  clean  between  printing--it's  just  like  the  regular  gelli  plate--your  preference--clean  it  every  time  or  not--it  depends  on  the  look  that  you're  going  for.   And  I  just  kept  the  plate  on  the  acrylic  mount  the  entire  time  I  made  the  prints--I  just  kept  wiping  away  the  extra  paint  as  I  went--very  easy  clean  up.


---really  liking  that  distressed  look,  and  I  also  like  the  fact  that  I  didn't  get  a  perfect  imprint  of  the  stencil.   And  if  you  look   to the  bottom  right-hand  corner of  it--that's  my  ghost  print  from  the  plate--the  negative  side?   I'm  not  sure  if  it's  the  negative  side  or  not-it's  just  the  plate  with  the   stencil  design  already  on  it  without  the  stencil--I  think  you  know  what  I  mean--right??  Here's  a  better  pic  of  it--


And  from  there  I  just  kept  going--randomly  'stamping'  the  6  and  4  inch  plates all  over  the  paper--


I  didn't  do  this  in  one  shot--there  was  a  lot  of  trial  and  error  experimenting,  until  I  started  to  feel  comfortable  with  what  I  was  doing.   By  this  time,  I  knew  what  kind  of  art  that  I  was  going  to  make  with  all  of  my  print  playing,  so  I  decided  to  'finish'  off   this  page.  I  could  have  left  it  as  is,  but  I  just  can't  seem  to  leave  that  white  space  alone--


I  love  the  way  this  came  out--I  could  have  left  it  this  way  and  put  it  in  a  frame  just  the  way  it  was,  but  my   real  love  is  paper  collage,  and  this  was  my  plan.

I  also  had  a  2nd  piece  of  watercolor  paper  that  I  used  for  my  ghost  prints,  and  I  added  just  a  little  more  to  that  one  also--


A  little  more  subtle--I  like  this  one  too.   The  only  thing  I  added  were  the  flowery  star-bursts,  and  here's  how  I  did  those--


I  took  my  stencil  sheet  and  stamped  it  with  the  4"  plate  that  I  applied  paint  to  in   random  spots  all  over  the  paper--easier  and  faster  than  actually  using  a  stencil  brush.  I  really  recommend  going  over  to the  Gelli  Arts  blog  and  watching  the  video--it's  a  lot  easier  to  see  than  to  explain.

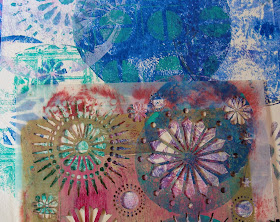
Okay,  so  here  are  my  papers--


 And  yes,  there  are  some  cut-up  circles  that  I  made  with  the  4"  plate--I  have  a  plan,  and  in  my  next  post  you'll  see  what  it  is.


Friday, March 6, 2015

Latest Work

I'm  been  making  lots  of  art  these  last  few  weeks--the  weather  is  SOOO  cold  (in hibernation mode)--so  this  is  what  I  do  when  it's  like  this--play  in  my  art  room,  with  thoughts  of  getting  ready  for  my  upcoming  show  season.


latest  funky  village


some  new  coffee  art

.....and  making  boxes....


And,  I've  also  been  loving  my  new  book  by  Jane  Davenport--"Drawing and Painting Beautiful Faces".   She's  been  inspiring  me--


And  this  is  just  a  little bit  of  what  I've  been  up  to.

For  you  local  readers  (PA , NY,  and  Ohio)  I'll be  listing  my  shows  within  the  next  month  on  my  sidebar...and  NEW  this  year--I'm  going  to  be  teaching  a  workshop!  I'm  a  little  nervous,  but  excited  about  it.   We'll  be  painting  our  own  papers  and  them  making  something  with  them--that's  in  September  (I'll  list  that  too).

And  oh  yeah,  what  else  is  keeping  me  busy??


this  little  cutie--my  grandson  Tj--I  watch  him  twice  a  week,  and  he  likes  to  remind  me  that  I'm  not  as  young  as  I  used  to  be  : )