Showing posts with label altered doll. Show all posts

Tuesday, August 15, 2017

New Mixed Media Tutorial

Hi  everyone!  I have  a  tutorial  for  this  piece  over  at   the  DecoArt  Mixed Media Blog--


It  all  started  out  with  the  doll  head  that  I  had  in  my  art  room  just  staring  at  me  for  the  longest  time--once  she  started  helping  me  create  herself  (because  it  took  a  little  while)--it  was  fun--check  out  my  step-by-step  process  HERE.

Tuesday, January 13, 2015

Another Mini Step by Step Tutorial

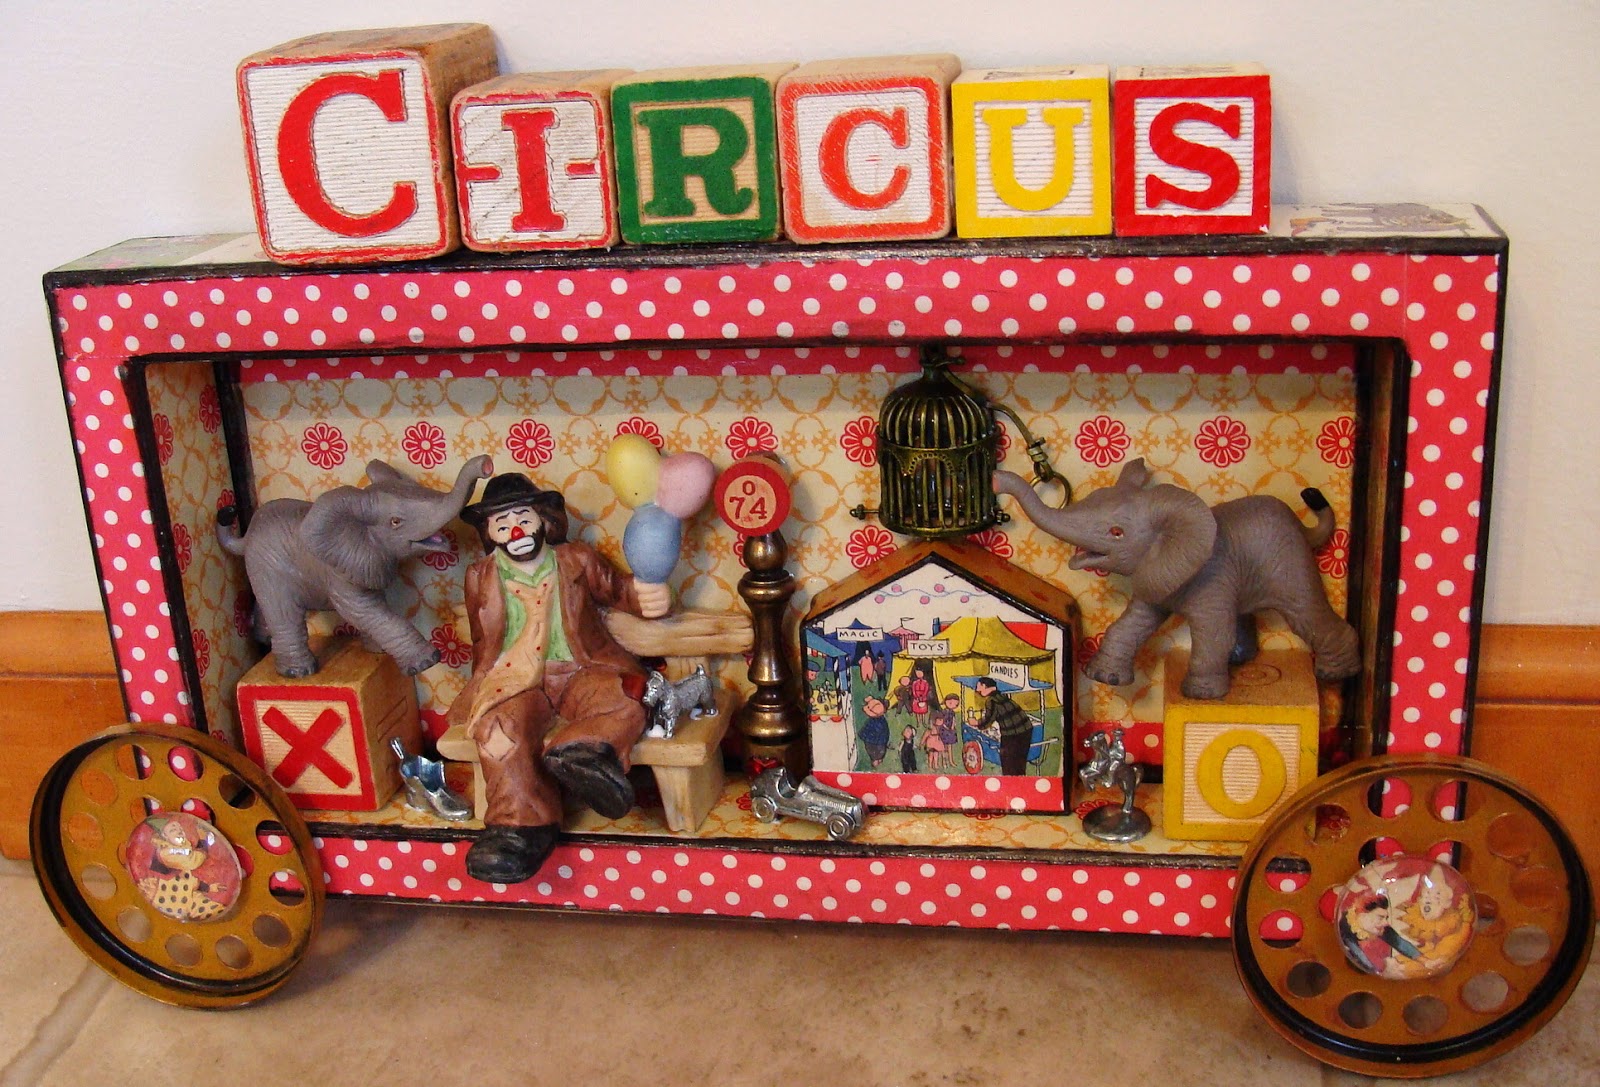
This  one  is  pretty  much  the  same  as  my  last  piece,  but  it  involves  a  little  assemblage  this  time.

I  started  out  the  same  way  as  before  (from  my  previous  post)  with  a  6 x 12  wood  cradle  board--


...collaged  book  pages  and  color  over  top  of  it,  and  then--


I  added  a  border  with  my  papers--love  how  they  come  together..

next--
I  went  through  my  stash  of  old  hardware--I  have  so  much  of  this  stuff--I'm  a  bit  obsessed  with  it--I  love  looking  at  the  different  designs  and  detail--always  different--so  back  to  what  I  did  with  these--


....first--I  painted  all  the  pieces  with  regular  acrylic  paint ( to whimsy them up a bit)-- then  sprayed  a  finish  over  them.

Always  love  the  possibilities  of  these little  goodies  that  I  find.

 
..what  they  can  become...


That  was  fun!--so  you  know  I  just  had  to  do  it  again!


When  I  make  these,  I  always  gather  my  papers  that  I  want  to  use  first,  and  the  papers  give  me  a  sense  of  where  I  want  to  go,  and  that's  how  this  angel  came  about.

I'm  still  playing  with  my  papers--more  in  the  next  post--stay  tuned.......

Tuesday, July 29, 2014

So What's Been Going On This Month...

It's   been  exactly a  month  since  I  last  posted--Wow!--it's  been  a  busy  month--and  gone  in  an  instant--too  fast!    So,  in  a  very  condensed  version--here's  my  month  in  review:


...made  some  new  art...but,  I'm  always  doing  that.......


Okay,  remember  the  bed  springs  from  my  last  post  (the  ones  that  I  found  at  the  flea  market?)--here's  what  I  did  with  one  of  them--playing  around  : )


....made  a  new  doll...


...and  a  new  box


and hey--I  also  got  some  new  books--the  covers  alone  are  inspiration  for  me!

So,  back  to  what  I  was  talking  about--oh  yeah--making  new  art--this  time--Finnabair  style--


But  the  main  reason  I've  been  super  busy  are  my  shows--I've  had  3  this  month,  and  another  one  this  coming  weekend--


and  I  now  have  a  little  visitor  twice  a  week  at  my  house--


"off  to  grandma's"  : )  little  Tj--he's  such  a  little  cutie--but  now  I  know  why  you  have  children  when  you're  young  : )

So  that's  my  month  in  review--I  hope  the  next  month  slows  down  a  bit--I'll  try  to  be  back  sooner.....

Friday, April 11, 2014

A Storybook Circus 2014

Last  year  at  this  time  I  was  getting  ready  to  leave  for  my  most  favorite  place--Disneyworld!   One of  the  very fun places  to  visit   there  is  Fantasyland  which  they've  been  doing a  lot  of  updating  to.   I  was   inspired  by  The  Storybook  Circus  there--you  can  see  how  it  helped  me  make  some  art  pieces  HERE.

Not  really  a  big  fan  of  the  circus,  but  love  making  circus  art.  So  the  first  thing  I  did  was  gather--


(this  was  just  the  start--but  a  good  start)


...knew  that  those  tinker  toys  would  come  in  handy  someday....


Next  was  my  clown/doll  assemblage....


I found  some  more  goodies--so--more  circus--


So--I've  had  a  fun  week--not  as  fun  as  Disneyworld--but  almost  : )


 We'll  be  going  back  for  sure,  but  this  time  with  our  grandson--even  better  to see  this
magical  place  through  the  eyes  of  a  child!


Monday, November 4, 2013

Playing With Painted Papers

One  of  the  ways  I  like  to  relax  is  to  get  out  my  paint  and  other art  supplies,  and  just  play  around  on  paper--just  for  the  sake  of  it.  I  know  in  my  mind  that  I'm  doing  it  for  a  reason,  but  in  the  moment--I'm  just  playing.   It's  my  way  of  journaling,  and  I  know  that  these  papers  will  not  go  to  waste---as  all  mixed  media  artists  know---nothing  goes  to  waste.


And  while  I  was  in  the  middle  of  painting  these--I  had  a  delivery  from  Stencil Girl--perfect  timing!
 
 
I  just  love  what  you  can  achieve  with  stencils--layered  or  all  by  themselves.   The  paper  on  the  left  I  made  using  just  one  stencil  from  Stencil  Girl  designed  by  Carolyn  Dube--I  know  this  stencil  will  be  going  into  my  'favorite  stencil  pile'!

So  here's  what  I  did  with  my  papers......I  started  out  with  an  8 x8 wood  cradle  board  (with  nice  deep  edges)  and  cut  out  pieces  of  my  papers  and  arranged  them  until  I  liked  the  results  and  then  got  out  my  gel  medium--


....added  a  little  paint  and  stamping,  but  I  knew  I  wanted  more,  so  I  started  looking  through  my  vast  array  of  flea  market  finds--hardware  in  this  case--

 
I  usually  like  the  rusty/patina  look  of  vintage hardware,  but  I  wanted  to  give  them  a  whimsy  look  to  go  with  the  piece,  so  I  just  got  out  my  acrylic  paints  and  there  you go!


What  I  did  next  was  take  another  8 x 8  cradle  board  and  flipped  it  over  to  make  a  shadowbox--


.....using  more  flea  market  finds--a  little  fairy  doll--love  this  porcelain  doll  that  I  found  earlier  this  summer.  Here  she  is  in  her  finished  home--


....again  using  my  papers  for  the  background  of  the  piece--along  with  a  washi  tape  border--gotta  love  that  washi  tape!


Okay,  next  I  decided  to  collage  on  a  plain  wood  mirror  frame  (love  making  the  functional  art  pieces)

 
--with  more  flea  market  finds  for  embellishments....


...loved  how  this  turned  out!
 
So  these  3  pieces  were  all  made  with  collaged  papers--


But  what  makes  them  more  unique  is  that  they were  all  made  with  my  hand-painted  papers--kind  of  like  painting  with  paper.   This  is  such  a  fun  technique,  and  you  can  never  have  a  'bad'  painted  paper--when  cut  up,  they  always  come  together  nicely........and  any  kind  of  paper  will  do  for  painting  too--try  it!!

Sunday, February 17, 2013

29 Faces Day 17

Yesterday  I  showed  you  the  start  of  my  new  face--
 
 
....but  let  me  back  it  up  a  little  bit,  and  show  you  before  I  even  started  the  face--
 
 
This  bell  is  from  my  Uncle  Carl's  bell  collection.  Last  December  he  passed  away  after  a  short  illness,  and  his  wife,  my  Aunt  Anna (aka Annie)  had  already  passed  some  years  ago.  So  my  cousins  have  decided  to  sell  his  house,  but  are  making  sure  that  everyone  in  the  family  can  have  some  of  their  belongings   which  made  up  their life.
 
My  aunt  was  an  avid  garage sale,  estate and flea  market  junkie--she  also  sold  at  the  local  flea  market.  And  I  think  my  uncle  got  a  teeny  bit  of  the  collecting  bug  from  her.   And  that's  how  I  got  this  bell.
 
And  after  some  investigating,  I  found  out  it's  either  a  telephone  ringer  bell  or  a  doorbell--I'm  going  with  the  telephone  ringer,  since  it's  only  about  5  inches  long.
 
Well  no  matter  what  kind  of  bell  it  WAS--it's  no  longer  that!


It's  now  a  Southern  'Bell'e  and  her  name  is  Annie  : )
 
I  think  she  would  put  a  smile  on  my  Aunt  Anna  and  Uncle  Carl's  face.
 
And  if  you  want  to  see  more  faces  today,  remember  to  visit  HERE.

Thursday, February 7, 2013

29 Faces Day 7

Today's  face  is of  a  different  sort--it's  a  porcelain  one--

As  you  can  see, I've  already  started  to 'dress'  her.  She's  been  in  my  collection  of  porcelain  doll  heads  for  a  couple  of  years  now--her  body,  long  forgotten,  but  fortunately, someone  knew  to  save  her  face  until  someone  came  along  to  rescue  her  and  bring  her  back  to life.   And  now  was  the  time  to  do  it!


I  gave  her  a  wooden  bobbin (I  think  that's  what  they're  called)  body,  and  dressed  her  with  vintage  lace  complete  with  some  jewelry,  and  pearls and roses  even  for  her  hair. 

Now  she's  in  her  new  home--


This  is  an  old  printer's  tray  from  the  early  1900's .  I  love  when  I  can  find  these,  and  it's  so  much  fun  hunting  for  those  little  pieces  that  belong  in  it.  In  this  case,  it's  her  new  home.

There's  a  kitchen--


and  an office--


a  game  room--


and  extra  space  for  the  lady  of  the  house--


and  even  more  faces  for  day 7--


(can  you  not  tell  how  much  fun  I'm  having!--just  like  a  little  kid)

 I  Loved  putting  this  together!   I'm  having  fun  with  this  29  faces  challenge!

And  if  you  want  to  see  lots  more  or  even  participate--visit  HERE--tons  of  inspiration!!

LinkWithin

Related Posts with Thumbnails