Monday, May 19, 2014

What to do With All of These Painted Papers

I've  been  painting  again--papers--it's  very  addictive!  This  time  I  started  with  my  Gelli  Plate--


....next  was  my  paint,  stencils,  stamps,  marking  tools,  and  whatever  was  at  hand--


...enough  already--time  to  start  putting  these  papers  to  use--


And  then  I  decided  to  add  a  little  variation  with  these  next  collages--


...using  images  of  my  owls,  a  book  page  from  a  child's  dictionary,  and  some  embellies...


still  had  more  papers--so  more  playing--...some  fun  with  molding  paste


...and  also  fun  with  rolled  papers--


So  by  this  time,  all  I  had  left   were  a  bunch  of  bits  and  pieces--but  I  kept  going--


And  there's  more  left--I  have  a  box  full  of  painted  paper  scraps,  and  they'll  always  come  in  handy  eventually.

These  pieces  were  fun  from  beginning  to  end--all  by  starting  out  with  those  blank  pieces  of  paper  and  just  letting  my  muse  take  over--love  making  this  kind  of  art!

Thursday, May 1, 2014

Painting to Make Art or Art Journal Pages or Etc.

That's  what  I've  been  up  to  these  past  couple  of  weeks.   I'll  always  put  art  journal pages  in  my  blog  titles--I  don't  really  have  any  art  journals (just  LOTS  of  idea  sketchbooks),  but  I  know  that  what  I'm  showing  here  could  also  be  great  for  journal  pages--especially  if  you're  just  starting  out  and  trying  new  art  supplies  and  techniques--art  journals  are  a  great  way  to  start--to  learn.

So  on  140lb  cold  press  watercolor  paper  this  is  how  I  warmed  up--


....laid  down  some  paint  with  layers  of  stencils  and  stamping....and  then--


I  first  sketched  a  design  using  my  General's  sketch  and  wash  pencil.   It's  a  water  soluble  pencil--so  if  you  don't  like  what you  draw,  just  take  a  little  water  to  wipe  it  away.   There's  lots  of  pencils  like  this  out  in  the  market,  but  this  one,  for  whatever  reason,  is  my  favorite  one  to  use.    And  then  when  I  liked  what  I  did,  I  went  over  the  pencil  lines  with  my  black  marker  pen  (Faber-Castel  pitt  pen)--then  I  blocked  out  the  design  with  more  acrylic  paint--basically,  painting  the  background  to  bring  the  main  design  out  into  the  foreground.

So  I  kept  going--


I  added  more  paint  (brought  in  the  violet  color)--some  more  design  elements  in  the  tree,  flowers,  and  birds,  added  a  sun.  And  I  also  used  my  Prisma  NuPastel  chalk  sticks.  I  have  a  couple  different  brands  of  chalk  pastels,  but  again,  these  are  my  favorite  to use--just  love  that  rich  color!

Finishing  touch--putting  it  into  a  frame--


Some  more  watercolor  paper--and  some  more  painting--


lots  of  doodling  this  time--I  call  this  one  "Gossip  Girls"  : )   (I  always  wonder  what  those  birds  are  chirping  about  in  my  neighborhood!)

And  remember  I  said  that  I  had  lots  of  sketchbooks  with  my  ideas  inside--they  always  come  in  handy  for  when  I'm  looking  for  inspiration--


....and  more  framing....


.......and more  painting....


This  one  took  a  little  longer---struggling  with  that  face--but  in  the  end --all  good...

So  this  is  what  I've  been  dong  since  I  last  blogged,  and  oh  yes,  the  most  important  thing---we  have  a  new  grandson!


Anthony Louis  (Tj for short)--8lbs. 3oz.--born  on  April  26,  and  I  was  there  for  the  whole  thing--amazing!!  He's  a  little  doll!

Friday, April 11, 2014

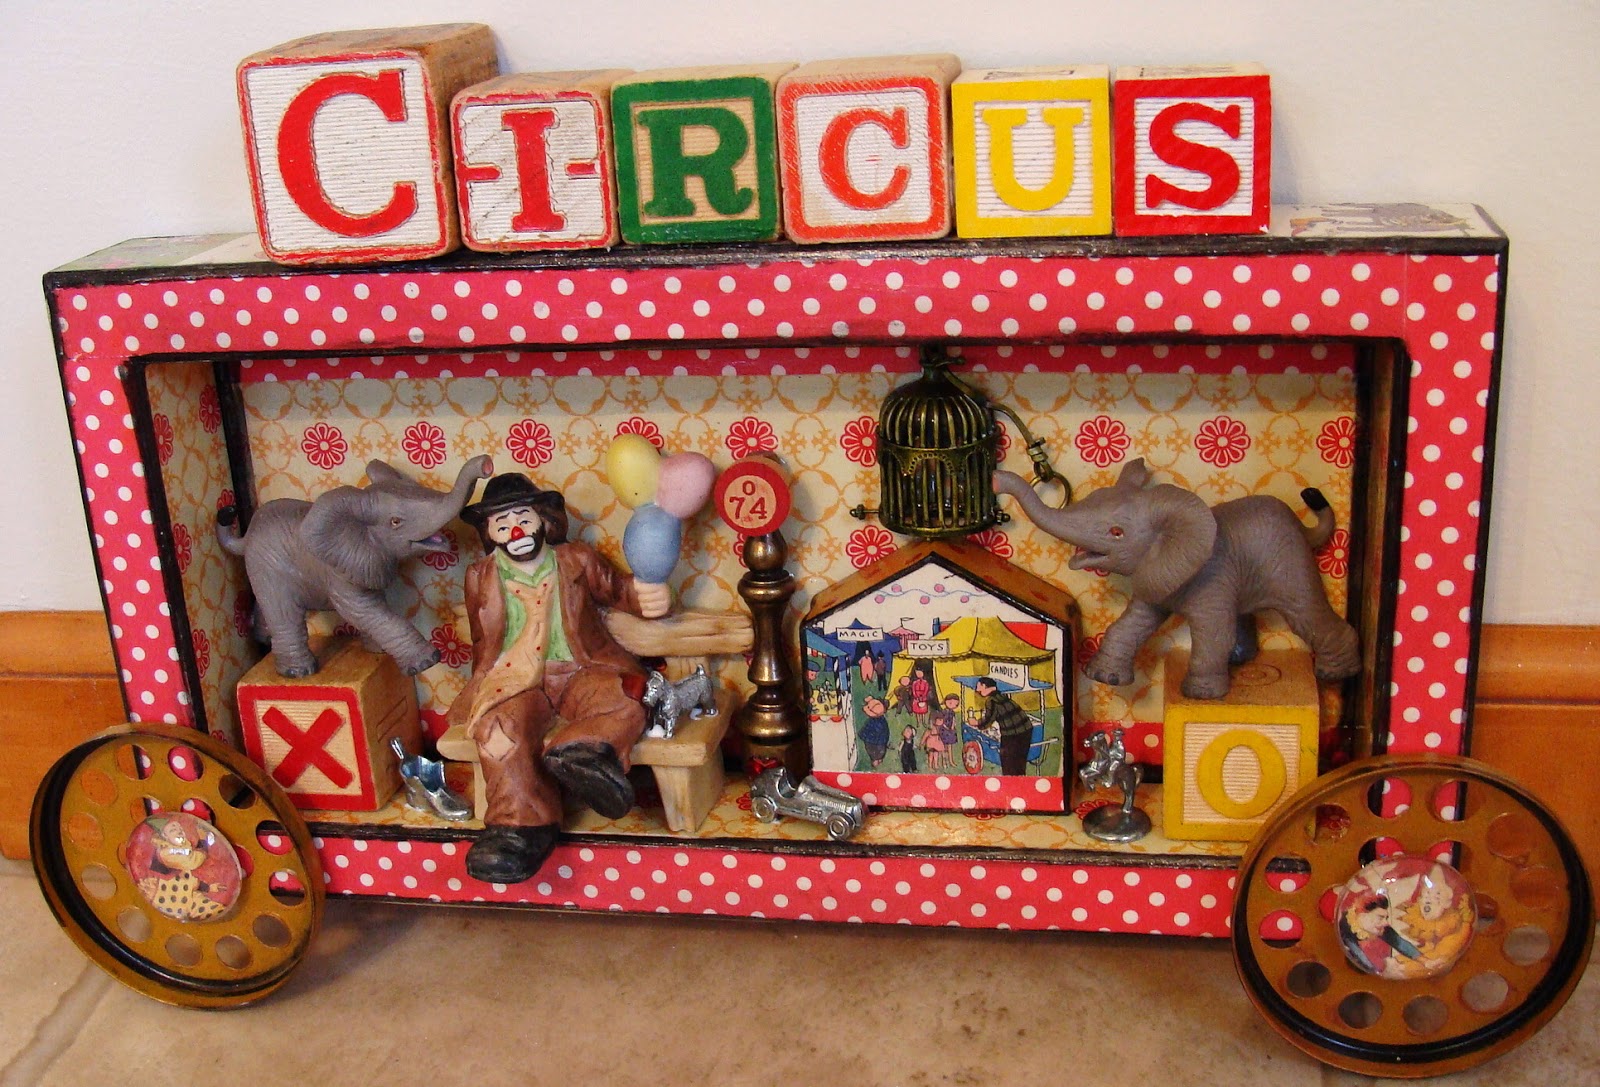
A Storybook Circus 2014

Last  year  at  this  time  I  was  getting  ready  to  leave  for  my  most  favorite  place--Disneyworld!   One of  the  very fun places  to  visit   there  is  Fantasyland  which  they've  been  doing a  lot  of  updating  to.   I  was   inspired  by  The  Storybook  Circus  there--you  can  see  how  it  helped  me  make  some  art  pieces  HERE.

Not  really  a  big  fan  of  the  circus,  but  love  making  circus  art.  So  the  first  thing  I  did  was  gather--


(this  was  just  the  start--but  a  good  start)


...knew  that  those  tinker  toys  would  come  in  handy  someday....


Next  was  my  clown/doll  assemblage....


I found  some  more  goodies--so--more  circus--


So--I've  had  a  fun  week--not  as  fun  as  Disneyworld--but  almost  : )


 We'll  be  going  back  for  sure,  but  this  time  with  our  grandson--even  better  to see  this
magical  place  through  the  eyes  of  a  child!


Wednesday, March 26, 2014

Taking Advantage of Your Own Art

I  don't  have  a  start  to finish  this  time  for  my  latest  piece,  but  I  wanted  to  show  you  ways  of  getting  the  most  out  of  your  art.   This  is  nothing  new  for  me,  and  if  you're  a  visitor  to  my  blog,  you've  seen  me  do  this  before---but  I  love  to  share,  and  spark  some  ideas  for  others  out  there.

So  I  started  with  a  big  blank  18 x 24  gallery  canvas--which  I  don't  like--that's  big  for  me,  but  this  time  I  took  it  one  section  at  a  time--almost  like  small  little  canvases--


And  all  together--


So  from  here--I  saw  the  opportunity  to  crop  different parts  of  it   and  make  some  more  art--

on  these  6 x 6 canvases.   When  I  print  out  my  art, and  then  adhere  them  to  the  surface  of  my  choice,  I'll  use  gel  medium  (coating  the  top  as  well),  which  creates  a  barrier.   This  helps  me  when  I  enhance  them with  more  color,  because  they  will  fade  and  bleed  slightly.  I  always  bring  the  color  back  out  with  pitt  pens (the  brush  tip).   For  those  of  you  who  aren't  familiar  with  them--they're  india  ink,  and  when  you  first  apply  them  you  have  about  a  minute  to  blend  them  with  your  finger  or  damp  paintbrush--they  are  wonderful  to  use,  and  they  mix  very  well  with  each  other, not  to  mention  every  color  of  the  rainbow  at  dick blick  for  the  best  price.  The  best  thing  about  them,  is  that  once  they're  dry,  they're  permanent--they're  not  water  soluble.

and  next,  I  do  what  I  usually  do--

 I  looked  for  a  box,  in  this  case  a  very  large  cigar  box--another  cropped  image  from  my  original  art  piece , and  then  I  searched  through  all  of  my  original  art  images  that  I  have  stored  in  my  computer (love  today's  technology!)  for  houses.  My  plan  was  to  have  a  neighborhood  of  houses  wrapped  around  the  entire  box--which  I  was  able  to  do....


I can  keep  doing  this  with  my  art--mixing  and  matching,  and  it  will  always  be  new,  because  it's  my  art,  and  you  can  do  the  same  with  yours--all you  need  is  a  printer,  and  your  imagination to  make  it  uniquely yours!

Thursday, March 13, 2014

Another Start to Finish

Okay,  I  have  2 pieces  to  show  today  and  kind  of  a  lesson  to  not  fall  in  love  with  your  layers.   I  usually  have  a  plan  in  mind  when  I  make  my  art,  but  sometimes  I'm  willing  to  let  go  of  that  plan.

So  here's  how  it  all  started  (this  is  pretty  much  how  I  start  my pieces)--


....paper  love--and  these  were  all  vintage  papers--book  pages,  ledger  pages,  a  map,  some  wallpaper,  and  even  a  handwritten  letter (a  thing  of  the  past anymore)

So  the  first  thing  I  did  was  randomly  collage  the  papers  on  this  6 x 12  canvas..


And  then  I  found  a  photo  reference  (keeping  the  theme  in  mind)--a  cover  of  a  1930  Modern  Priscilla  magazine--


Here's  where  my  plan  started  changing--as  you  can  see,  I  was  trying  to  keep  those  great  papers  peeking  through  the  painting,  but  as  I  kept  going--it  just  didn't  work  out  that  way--


I  basically  let  my  muse  take  over,  and  ended  up  very  happy  with  it--I'm  the  only  one  that  knows   that  those  papers  are  under  there,  and  I  kind  of  like  that.

So  I  tried  it  again--


This  time  I  decided  to  go  a  little  heavier  with  the  paint,  and  I  love  the  effect  I  got  by  applying  the  paint  with  a  credit  card  and  a  brayer.

But  again,  my  plan  changed--


and  boy,  I  Really  changed  this  one--it  doesn't  even  have  the  colors  that  I started  out  with--but  I'm  so  glad  that  I  got  my  mind  out  of  the  way,  and  just  started  painting.

Lots  of  texture  on  this  one--


...molding  paste  on  the  flowers


the  pears  were  collaged  on  (using  the  handwritten  letter)  and  then  I  added  paint  to them,  but  you  can  still  see  some  of  the  original  writing.   The  only  thing  left  on  this  piece  from  the  original  background  is  the  little  butterfly  next  to  the  leaves.

So  when  you're making  art,  the  lesson  would  be--don't  stop  until  you're  in  love  with  what  you've  done,  remembering  that  it's  only  paint,  and  it  can  be  covered  up--and  an  added  bonus--the  more  layers,  the  cooler  the  end  result.

Sunday, March 2, 2014

Making Lots of Art

I  have  some  new  art  to  show  and  tell  here.   I'm  getting  ready  for  my  summer  show  season--just  waiting  to  hear  back  from  each  show.   The  application  process  for  art  shows  is  not  my  favorite  part.   Each year--all  new--you  have  to  re-submit  your  application  with  your  art  photos,  and  then  wait,  wait,  wait  to  see  if  you  'get  in  the  show'.  Some  of  these  shows are  not  easy  to  be  a  part  of   (lots  and  lots  of  very  talented  artists   apply ),  and  I  never  know  what  my  real  schedule  is  until  usually   April.

But, never mind  about all of  that--some  new  art  to  show--

 
Hydrangeas  on  a  cupboard  door  (tired  of  looking  at  snow  all  the  time!)


..a  new  owl


...and  my  latest  new  subject  to  paint--Fish--with  a  touch  of  whimsy  :-)

And  this  week  I  did  good  at  the  cigarette  shop  here--


5  very  nice  wooden  cigar  boxes  for  just  $1.00  each--great  deal!!

Here's  one  of  them  brought  back  to  life--


....with  canceled  postage  stamps  collaged  on  it--love  taking  the  old  and  making  it  all  brand  new  again  (don't  think  this  box  will  be  used  for  cigars  : )

And  another new  box--using  my  favorite  new  technique  (see  last  post)


And   more  art  on  the  way  for  at  least  one  certain  show--it's  already  listed  on  my  sidebar--in  June--in  Fairport,  New  York  (Rochester  area).   That's  where  I  list  my  show  schedule--there  will  be  more!

LinkWithin

Related Posts with Thumbnails