Showing posts with label Gelli Plate printing. Show all posts

Friday, October 2, 2020

My Art Retreat in September

 I  prepared  for it  all  year,  and  in a  second, it  seems, it's  over, and  it  was  so  much  fun  and especially  needed  this  year!  There were  a  total  of  6  of  us, and  the  just  the  right  number  for  a  comfortable  working  distance  from each  other,  with  this  year's  weird  circumstances.


and  the  best  part  were  all of  these art supplies   together  and  being  able  to   play  for  3  days (leaving all of our other outside problems at the door)--


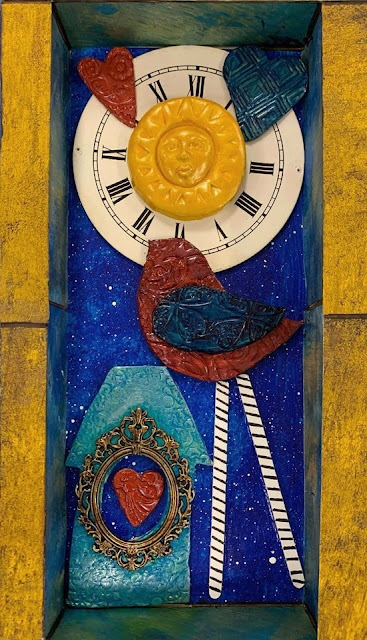
This year was all about faux encaustic and polymer clay.  I became interested in polymer clay when I saw that I could use it as an element in my mixed media art pieces, and I wanted to show the versatility of this very forgiving medium.  Here are the results of the class--


The best part about this is how their creavity took over and helped them express themselves.  I  showed  them  the techniques  and  told them to stand  our of their own way, and that's what they did.   

This  retreat went way  too  fast  that's for sure--can't  wait  till next year!


Saturday, January 2, 2016

A New Cat Tutorial For 2016--My Step-by-Step Process

Welcome  to  2016  everyone!   I've  decided  to  start  out  the  year  again  with  another  piece  of  cat  art,  since my   cat  tutorial  from  a  year  ago  was  SO  popular.   So  here's  another  cat  tutorial  for  you--basically  the  same  thing--just  a  little  bit  of  a  variation  from  the  original.
My  new  cat--


.....and  back  to  the  beginning  of  it--

Once  again  I  warmed  up  by  getting  out  my  Gelli® plate  and  my  paints  and  brushes  and  had  some  fun--


.....and  again  I'm  just  using  here  110lb  card stock  that  I  find at  my  local  office  supply  store  (Staples).  I  also  like  to   use   scrapbook  papers   that   I'm  not  too  crazy  about  that  I   get  in  the  pads  --they work  great,  and  you  can  get  some  of  the  background  design  of  the  paper  to  peak   through  if  you  like  or  cover  it  up  completely--the  heavier  scrapbook  papers  hold  up  really  well  to  layers  of  paint.  And  book  pages  are  fun  to  use  also--good  ones  are  the  over-sized  children's  picture dictionaries  or  story  books (depending  on  the  paper--they  also  hold  up  well  to  anything  that  you  may  want  to  do to  them).

I  chose  my  'color  palette'  for  my  6 x 18  birch  cradle  board--


.....and  made  my  background  with  my  papers--


.....and  then  I  outlined  the  moon  on one  of  my  papers from  the  template  that  I  made,  got  out  my  gel  medium,  put  it  on  my  surface,  and  then  added  some  washi  tape  borders.....


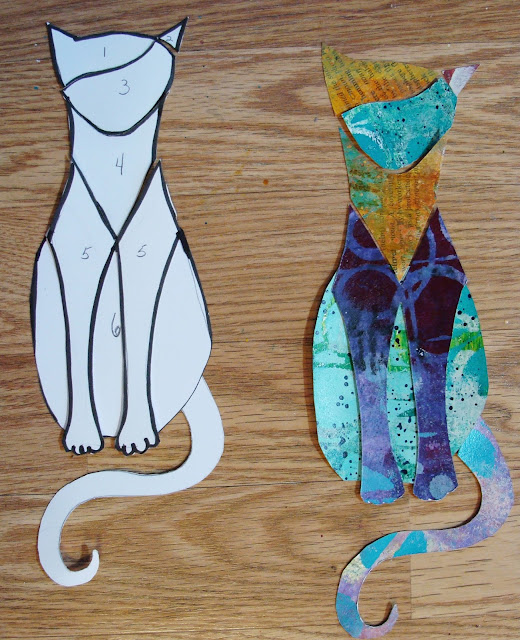
next--I  drew  my  cat  template,  cut  it  up  and  numbered  it  for  my  papers  that   I  chose  to  use  for  the  cat--


--after  that,  got  the  gel  medium  out  again  and  placed  my  cat  on  the  moon  along  with  some  scattered  stars--


This  is  when  you  want  to  bring  the  cat  out  of  the  background  by highlighting  and  shading  areas  of  it    I  used  my  inktense  blocks  for  this  part.   If  you're  not  familiar  with  these,  they're  watercolor sticks.   You  just  color  in  the  area  with  them  and  then  apply  water--the  difference  is  that  they're  made  with  ink  and  are  very  intense  color  (I  guess  that's  why  they're  called  inktense).  They  did  exactly  what  I  wanted  them  to  do--


You  can  also  see  here  that  I  outlined  everything  with  black--still  using  my  favorite  permanent  pen  that  I  used  last  year--my  Fude  Ball  pen.
And  I  also  let  my  muse  take  over  and  let  the  piece  tell  me  what  else  it  needed.   I  added  some  ephemera  flowers  on  the  body  and  along  the  border--

And  I  added  the word 'wish'......and  a  little  more  embellishing...


......and  also finishing up the sides.......


So  now  that  it's  all  finished,  it's  ready  to  find  a  new  home--it's  for  sale  in  my  Etsy  shop, which  you  can  find  HERE.


....or....start  playing, and  make  a  cat  (or  whatever  you  want)  using  papers  that  you've  painted--it's  fun  seeing  your  art  progress  along  the  way--the  more  you  play,  the  more  you  want  to  play!  :-)

Monday, July 6, 2015

A Mini Tutorial--Painting Papers Again

I"ll  start  out  by  saying  that  I  have  a  problem  with  stencils--I  can  never  have  too  many--and  right  now--wherever  you  look,  you'll  find  new  styles,  sizes,  shapes,  etc.--which  is  fine  by  me.   One  of  my  favorite  places  to  find  them  is  at  Stencil  Girl  Products.  You  can  get  lost  in  that  place  for  hours--tons  of  stencils  designed  by  popular  mixed  media  artists.   This  time  I  ordered  some  from  a  couple  of  my  favorites--Carolyn  Dube  and  Laurie  Mika--took   2  of  the  new  stencils  I  got  and  combined  them  to  come  up  with  this  paper--


....and  I'll  show  you  how  I  did  this...

first  I  started  off  by  painting  a  background  on  a   110lb  white  cardstock paper (great  paper  from  Staples)


This  looks  great  as  is--but  I  wanted  to  keep  going  with  it.   So  I  go  out  my  delicate  surface  painter's  tape,  and  my  new  Carolyn Dube  Buildings  stencil


...and  my  black  acrylic  paint--
--some  tips--I  used  waxed paper  underneath  the  paper  when  I  put  the  tape on,  and  very  carefully  lifted  the  tape  up  when I  was  finished--I  didn't  even  wait  for  the  paint  to  completely  dry--I  wasn't  worried  about  the  paint  moving  as  I  was  more  worried  about  ripping  the  paper.   But  it's  pretty  easy  if  you  use  delicate  surface  tape--Scotch  brand.
 .......but  I  wasn't  finished.....

I  taped  up  the  paper  again,  this  time  in  the  opposite  direction  and  used  my   Laurie  Mika  stencil  using  Titan  Buff  paint.

and  that's  how  I  got  my  end  result--


 So next  I  got  out  my  gel  medium, and  some  scrapbook  paper  and  sheet  music  to  make  some  texture


I  like  to use  the  gel  medium,  because  it's  more  flexible  when  it's  dry,  and  when  you  cut  up  the  papers  for  collage  it  makes  the  textured  papers  very  easy  to  work  with.  I  pretty  much  covered  up  the  scrapbook  background  with  more  acrylic  paint,  but  I  didn't  have  to--I  could  have  wiped  some  paint  away  to  bring  out  the  original  background.   In  this  case,  though,  I  added  lots  of  layers  of  paint---putting  it  on  and  taking  it  away,  until  I  was  happy  with  it.

And  here's  another stencil  by  Carolyn Dube --this one's   great  on  its  own--


I  added  these  papers  with  other  ones  that  I  painted  and  textured,  and  even  some  Gelli  prints  thrown  into  the  mix--


I've  been  playing  a  LOT  with  these  papers  now,  but  this  post  is  getting  way  to0  long,  so  I'll  show  you  just one  piece  that  I  made  (show  you  more  in  the  next  post)

I  found  this  very  sad  cupboard  door at  a  flea  market  recently.  I  loved  the  size  (10 x 30),  and  I  knew  that  if  I  didn't get  it,  most  likely,  it  would  have  been  trashed.  It  was  in  really  bad  shape,  and  I  knew  I  could  do  something  with  it.


....so  I  started  using   my  papers--


 With  help  from  my  painted  papers  I  was  able  to  give  this  forgotten  cupboard  door a  new  life.    I'll  show  you  more  next  time......

Wednesday, November 19, 2014

New Painted Papers=New Art

I  have  to  say  that  this  has  to  be  one  of  my  favorite  ways  to  create  art--'painting'  with  my  papers that  I  painted.   The  first  thing  I  did  this  time  was  get  out  my  Gelli  Plate--


I'm  still  a  beginner  when  it  comes  to  the  gelli  plate,  but  you  still  get  great  results.  The  scraps  that  you  see  laying  there  are  what  I  used  as  masks  on  the  plate,  and  they're  ready  to  use  as  collage  also.

Next,  I  went  for  texture--


I  got  out  my  heavy  gel  medium,  stencil,  and  texture  comb (hair  pick)  for  the  front  2  papers,  and  the  back  one  is  textured  wallpaper.

And  then  more  painting  with  all  of  my  paint  that  I  had  out--


added  with  my  printed  papers--there  ended  up  being  a  good  amount  to  play  with.   I  just  want  to  mention  that  all  of  these  papers (including  the  textured ones  in  the  photo  above)  are  a  110lb  cardstock  paper--stands  up  to  anything!  I  paint  on  these  like  I  would  on  a  canvas  or  any  surface,  for  that  matter.   I  get  it  at  Staples  (office  supply  store),  in  a  big  pack  that  lasts  a  Long  time.

I  started  with  a  6  x  18  wood  deep--edge  cradle  board--


I  really  like  this  size.....so.....I  made  another  one..


....this  time  I  used  my  textured  paper  for  the  roof..


...and  added  some  fun  embellishments..


a  knob  and  an  old  door  faceplate  that  I  painted  to  match  with  the  colors  of  the  house.

And  1  more  6 x 18--


haven't  made  an  angel  in  a  while--this  was  fun--I  added  some  ephemera  to  the  dress--really  liked  how  she  turned  out!

More  paper  fun--


using  up  those  scraps  this  time  on   8 x 8  cradle  boards..


And  1  more--probably  my  favorite--my  'upcycled'  piece--


a  cupboard  door


I'll  always  find  a  use  for  all  of  the  'stuff'  that  I've  collected  over  the  years  : )

LinkWithin

Related Posts with Thumbnails