And at my party I showed you my work in progress, and I finished it, and I'm very happy with it, although it was very hard to get a good shot of this because it's a very dimensional piece--
I'm going to show you a step-by-step of how I put this together. I started out with this very cool canvas that I found (with the help of Suzi) at Dick Blick--
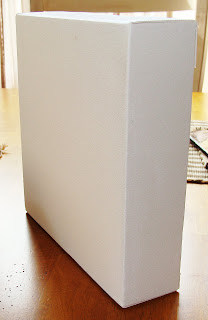
 This is a 9 x 9 canvas with very deep sides--2 3/8". I love these--I bought them in the 4-pack. And then what I did, was turn it over, because I wanted it to be more like a shadobox. Then I collaged some of my papers and prints on it and also added paint. Basically, I just covered every part of the canvas.
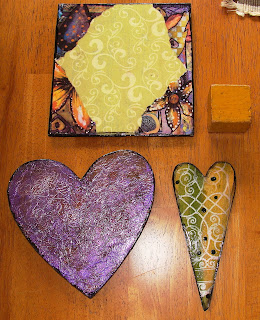
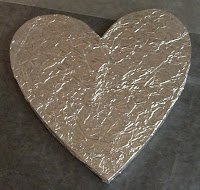
 These are the different pieces that I used to put into it. You see that yellow block to the right? (vintage child's block--got it at the antique show), well it was the perfect height to elevate the main heart from the surface of the canvas. So the technique that I wanted to show you is a fairly popular one. It's using aluminum foil--so simple. If you know how to use gel medium, then you can do this. I say gel medium, because that's what I used--you can use any type of glue. And there are a few ways you can apply the foil also. The way that I did it this time--I crinkled up a piece of foil and then opened it back up and laid it flat and then applied it with the gel medium onto the larger heart.
 Another way of doing it, is to not crinkle the foil and apply it to the surface with extra heavy gel medium and while the gel is still wet, you can take the blunt tip of a paint brush and make designs into it or whatever you want. You just have to be a little careful, because it can tear. And then another way is to glue down embellishments onto your suface, and then apply the foil crinkled or uncrinkled. You'll get the imprints of whatever you embellished--it also gives great texture.. So after I put the foil on and it was dry, I just put some alcohol inks and acrylic metallic paint on it. I always put a gloss varnish over that--you get the look of metal--very cool, very easy, and very inexpensive. Alot of journalers (is that a word?) have used this technique for the cover of their journals. And if you click on this for the close-up, you can really see the texture.
So after I assembled the collage, I put the final touch on:
I used a metal picture frame and attached a piece of jewelry that I found in my stash.
And before I was even thinking of making this collage, I was using my Golden paints on something else, and I had some left over, and there aint no way I'm wasting this expensive stuff, so I just painted myself up a paper, which happened to work perfectly for the border and smaller heart.
So if you look at the jewelry piece--a pendant, actually, fairly large--and the paper--they match perfectly. In person, they really are the same colors, right down to the swirls. And I painted this paper with no particular thought in mind, and I didn't even remember that I had this pendant until I found it afterwards. But you know who did know that I had it?-- Clara!
For those of you who don't know, Clara is my muse. You can read about her here, and then here (the image on this one is hanging with me in the studio), and then here. So, I have to say Thank You to Clara for this part!
And also, I started a new class--not like I have anything else to do. You know when you go to a restaurant with that delicious buffet, and you have to get EVERYTHING, and your plate is just overflowing? Well, that's my life right now. So I'm glad that this is an ongoing class. It's with Sharon again at All Norah's Art--
Faces in Technicolor. I'm going to have to put this class on hold until late July. I have 2 shows back to back next month, and next week, I'm taking a mini vacation. But this post is getting long, so I'll tell you about it in my next post--stay tuned.
And if you missed my studio tour party, its the post right below this.


32 comments:
This piece is fantastic! I would never have thought to turn aroudn the canvas and use it as a shadow box. Beautiful! And thanks for the tips. :) I love seeing how the art work is made.
Beautiful dear Diane, bravoooo!!!
Kisses
Thanks so much for the lesson. You did a great job with explaining each and every detail. The shadow box effect is super!
Again you inspire me, Diane, :)! Love visiting you and discovering such fun artsy tips. I will definitely plan to try the foil technique ~~ love the texture and metal effect. Thanks for sharing, and Happy Creating!
Love how you've made a shadow box out of a canvas, thanks for the tutorial. I was totally intimidated by the views of studios. No matter what I do mine seems to end up messy but I love neat, oh well. I like your analogy of life as a buffet, I can equate to that, lol
Love the texture that foil technique gives. Very cool. Thanks for sharing. Also your piece is gorgeous. I love it.
Oooh lots of good tips there! I really like that idea of turning the canvas round.
I love this technique. Yep, I've tried it, but never got the same wonderful results you did.
What a great post and story. And how did you manage to get this made and still blog hop? You are amazing.
This looks like so much fun! I love how you turned the canvas aroun; so clever! The foil heart reminds me of a star I made for my Christmas tree when I was first married (a long time ago!) I didn't have any money and it really spruced things up! Thanks so much for your demo; you are so inspirational! Jennifer:)
i love how you
delve in & explore
mediums & textures & layers
& are brave & beautiful
&
full
of
heart
to be sure.x
I love knowing about these canvases--I/ve been looking at some to turn over and make little shrines in, but nothing was deep enough--these look good!! As does your piece!
Your art is fabulous-and you are so giving to show your techniques---love that both side of the art are beautiful! Thanks for stopping by and following my blog!
What a great piece of work. I love that canvas size and it does look like a shadow box. Thanks for the step by step process. Great ideas.
How cool! Love the colors and textures. It has been a long while that I used aluminum foil. You inspired me to play with it again.
How beautiful, Diane! Thank you for showing how you created this amazing work of art. Just stunning! :) And have fun with your new art class! Theresa
This is so awesome! I really appreciate the sharing of the step by step. How inspiring. Too bad I have to clean and do laundry today. Blah! Great job...so creative.
T
This is an awesome piece!!! And I want to say.... you produce sooo much art and share sooo much....that "whatever" your studio is or how it is arranged is totally productive!! Some studios can look great or have all the stuff and not get much done! Mine is non-productive at the moment!....so I say there couldn't be a more special studio for you than "YOURS"!! Just keep up all that wonderful creating you do and the sharing too!! I have learned lots from you and that is also what keeps people coming....you give. Have great shows and rest and joy!
I've been thinking about you and your beautiful mixed media pieces all weekend while I've struggled to use my neocolor crayons. Ever thought about doing a tutorial on using those?
That is such a NEAT technique!!! Thanks for sharing, one day I may have the courage to try it. :-)
Gorgeous!!
oh this is so much better than watching television!
your post was filled with the deliciousness of creating step by step!
thanks for the visual journey!
ciao bella
great piece, btw!
creative carmelina
so beautiful!!!! Fantastic
Over the moon fantastic! This is such a textural art piece. Thank you so much for sharing your techniques. Happy creating...
I never leave your place without being excited about your work....
Your creativity amazes me....as well as your generosity....
Thank you
Wonderful work as usual Diane :)
If you do decide to take the etsy step, you be sure to email me and i'll give you all the knowledge I have on etsy stuff (that might not be a lot though so you may need to ask others too lol)
Hugs
Micki x
Oh, Diane, this piece is amazing!! I would never think to do anything like this, but now I might just give it a try. I've been catching up on your blog and I have to come back later to take my time and see what you've been up to!! Love, Silke
Fabulicious!!!! You come up with the most creative pieces. Rock on girlfriend! Beautiful!
What a fun piece. Thanks for all the great tips.
I want to start Sharon's new class, too. Like you, I have to wait about a month after the art fest I'm supposed to be preparing for.
this is so beautiful, and such clever use of the canvas! i traveled over from "dancing mango", glad i found you!
I had to take some time to come and visit, it is important to me to see what your doing, because you just go ahead and do wonderful rich looking decorative things for people's homes. This is a great piece and it really has a rich look and it isn't just the color it is the design put together just right.
Now it is summer, enjoy every minute with what you love, and there are many things.
Diane,
What a neat shadow box! Thank you for your teaching thru the entire thing. I am impressed w/it.
Hope u have a great time and luck at the artfest.
hugs, darlene
I love your blog!!! Feel like I have so much in common with you...love of scrapbook paper...garage sales...thank for commenting on my blog and reading my Somerset Studios article...I had so much fun doing it..getting ready to submit another..blessings, e'layne
Post a Comment